Teleoperation DAQ and Data Conversion
This page covers the complete workflow for teleoperation data acquisition and data conversion on the Fourier GR3 series robot, from device preparation and exoskeleton teleoperation to DAQ platform usage and troubleshooting.
1. Overview
The teleoperation DAQ system is a local data acquisition solution for the Fourier GR3 series robot. It enables full-body wireless teleoperation control via an exoskeleton device and client application, while capturing motion data, posture data, camera images, and depth data in real time with local storage. The system operates without cloud server dependencies, making it suitable for industrial and research scenarios that require data security and offline capability.
Core Features:
| Feature | Description |
|---|---|
| Low-barrier operation | "One-button + status guidance" design — the exoskeleton uses only red/blue function keys for state switching and recording start/stop, with detailed prompts and log feedback |
| Full-body teleoperation | Supports GR3 full-body control including standing, walking, turning, squatting, and arm movements with low latency and precise command synchronization |
| Wireless connectivity | LAN-based wireless communication eliminates wired constraints |
| Multi-dimensional acquisition | Captures motion data, posture data, camera images, and depth data per user-controlled recording session |
| Visual feedback | Real-time display of teleoperation status, acquisition status, system logs, first-person camera view, and third-person posture view |
2. Pre-Teleoperation Preparation
2.1 Robot Preparation
- Hoist the robot so both feet are approximately 20 cm off the ground
- Power on the robot and NUC, wait approximately 20 seconds
- Release the emergency stop red engagement knob
2.2 Device Topology
| Device | Connections |
|---|---|
| PC3 (Teleoperation Master Computer) | Power; USB + HDMI for keyboard, mouse, monitor; USB for exoskeleton device; Ethernet to Xiaomi router |
| NUC (Robot Side) | After robot power-on, connect cameras via the rear docking station |
| Xiaomi Router | Ethernet direct to PC3; wired connection to Xiaomi router (optional LAN) |
2.3 Exoskeleton Wearing
- Adjust arm component length according to user height to fit the overall exoskeleton
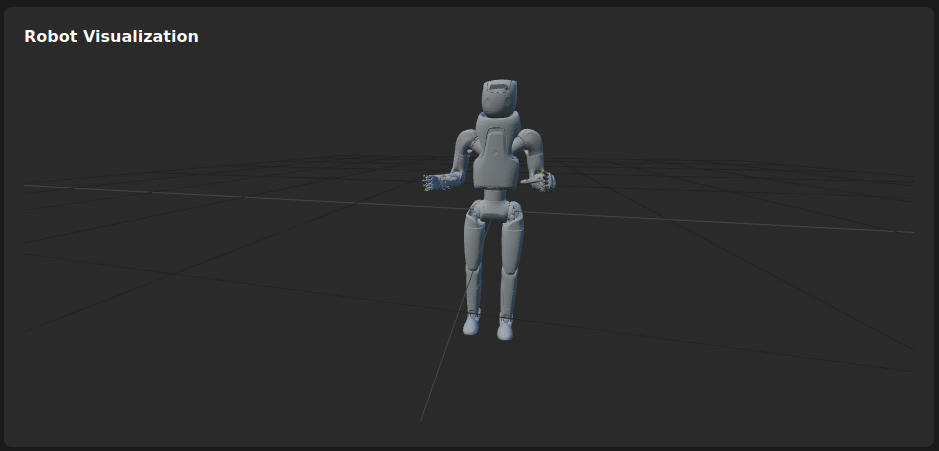
- After teleoperation is started and the exoskeleton is properly worn, the virtual robot in the monitoring software will mirror the user's body movements in real time
- Before starting teleoperation mode, verify that the virtual robot posture in the teleoperation viewer exactly matches the physical robot's current posture
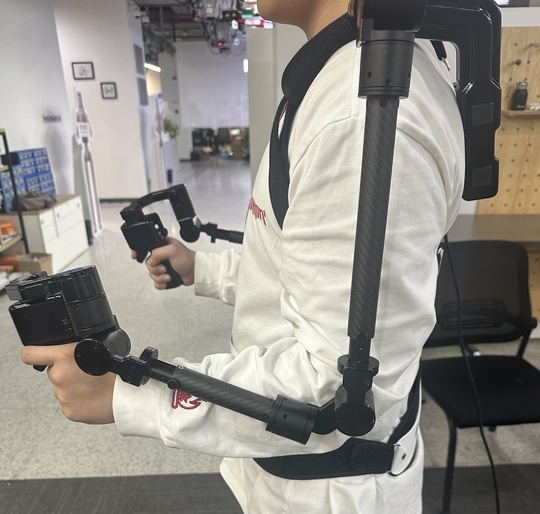
Failure to match virtual and physical robot postures before starting teleoperation may cause unexpected robot movements.
3. Exoskeleton Teleoperation Guide
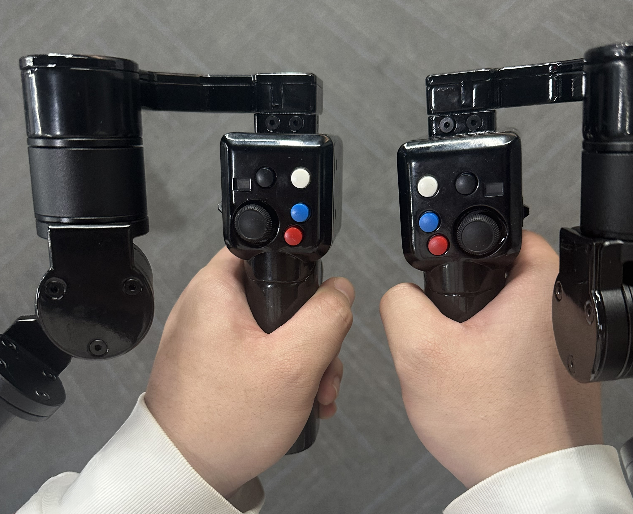
3.1 Right Handle Buttons
| Button | Function |
|---|---|
| Red | 1st short press: enter teleop ready; 2nd short press: control robot subsequent short press: start/stop recording; long press (3s): discard current recording |
| Blue | Short press: exit teleoperation |
| Black | Short press: turn waist left |
| White | Short press: turn waist right |
| Joystick | Up: stand up; Down: squat; Left: turn left; Right: turn right |
| Trigger | Finger open/close |
3.2 Left Handle Buttons
| Button | Function |
|---|---|
| Blue | Short press: bend forward |
| Red | Short press: stand up from bent position |
| Joystick | Up: walk forward; Down: walk backward; Left: strafe left; Right: strafe right |
| Trigger | Finger open/close |
4. DAQ Platform Usage
4.1 Check Status
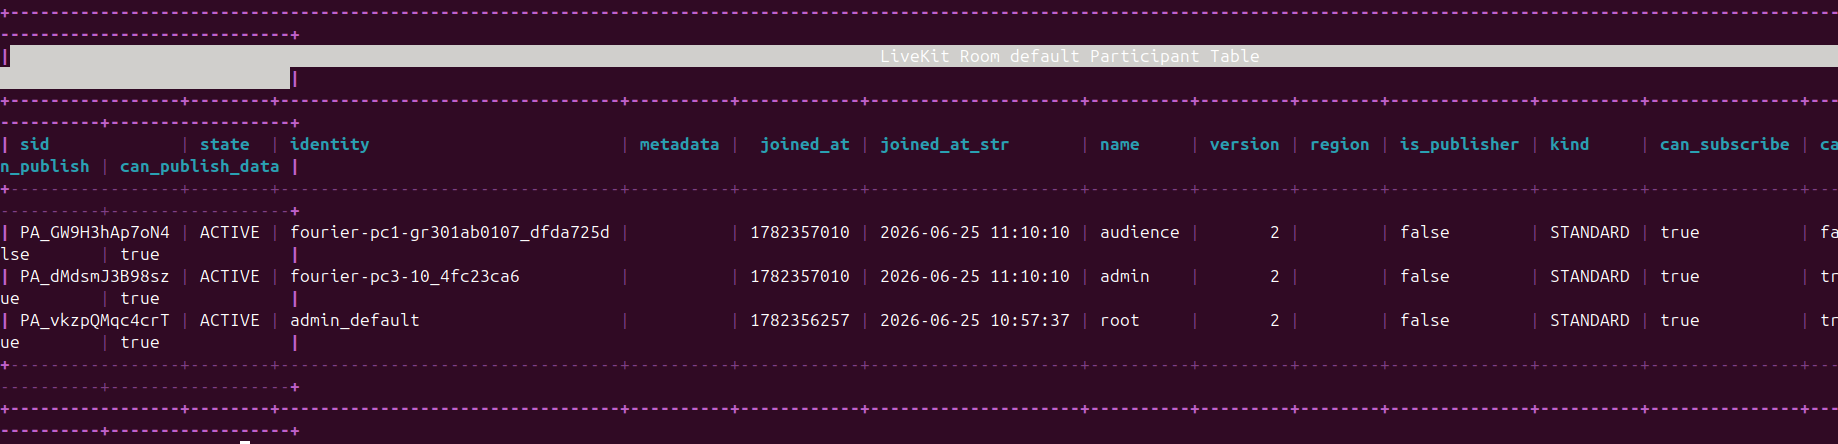
Run the following command on the master controller. The output shown below indicates success (three IDs: pc1, pc3, admin):
daemon-cli list p
4.2 Open DAQ Platform
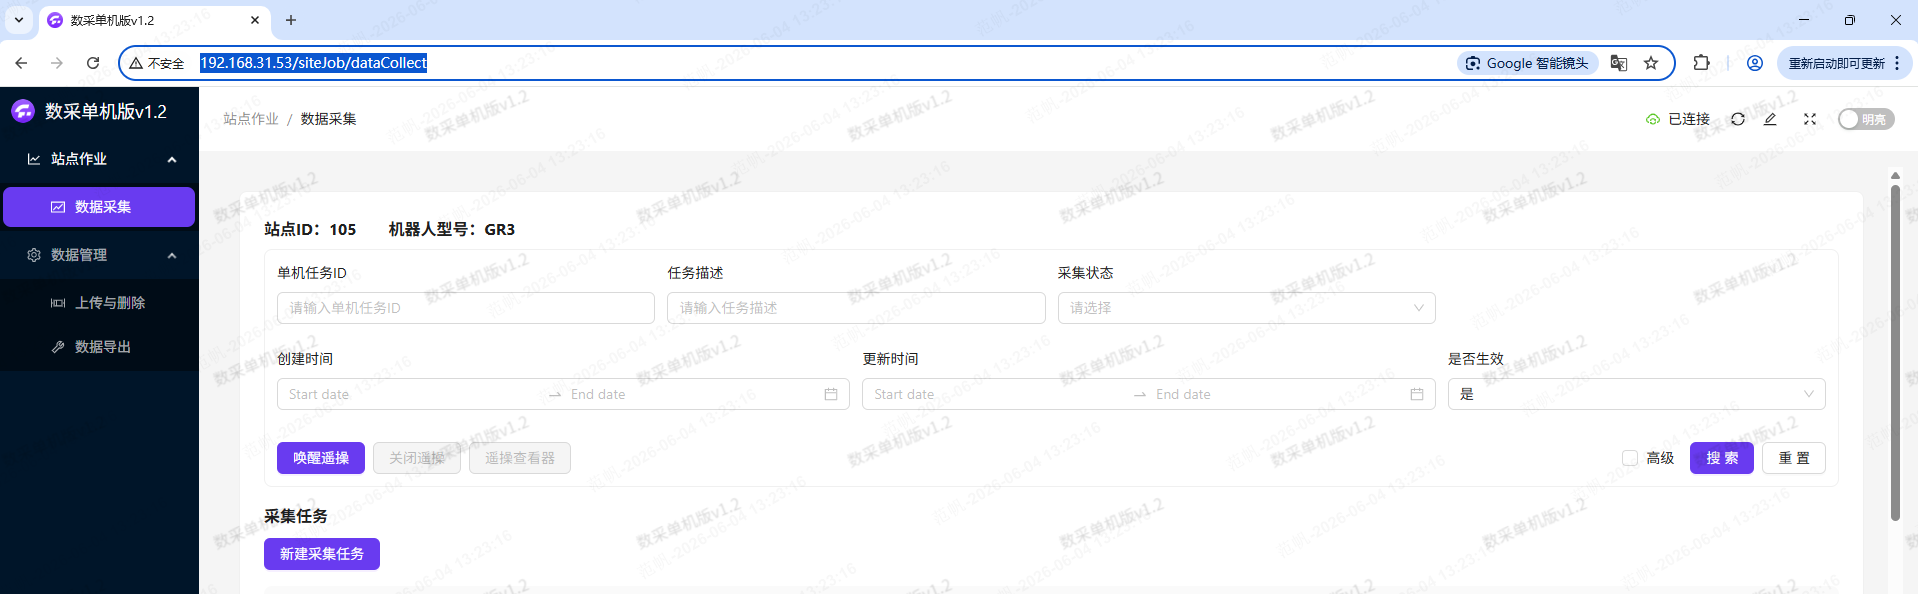
Open Google Chrome and enter the PC3 IP address or 127.0.0.1 in the address bar to access the DAQ standalone platform.
4.3 Connect to Cloud Platform
- Click the top-right corner to enter system configuration
- Fill in "Cloud Address", "Site ID", "Robot ID", and "Hardware Version"
- Click Save
- The top-right corner showing Connected indicates a successful connection to the DAQ cloud platform
4.4 Create DAQ Tasks
Cloud Tasks: Created on the DAQ cloud platform and dispatched to the standalone platform — click Refresh on the standalone platform to view them in the task list.
Standalone Tasks:
- Click "Create Acquisition Task"
- Fill in the task description and select "Active"
- Click Confirm to generate a standalone task
4.5 Wake and Shutdown Teleoperation
Wake Teleoperation:
- Click "Start Acquisition Task" (if no task exists, the system will auto-create a standalone task)
- Click the "Wake Teleoperation" button
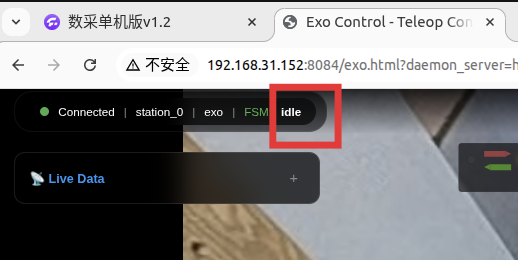
- After successful wake, the system automatically switches to the monitoring view — seeing
idlestatus indicates success
Shutdown Teleoperation:
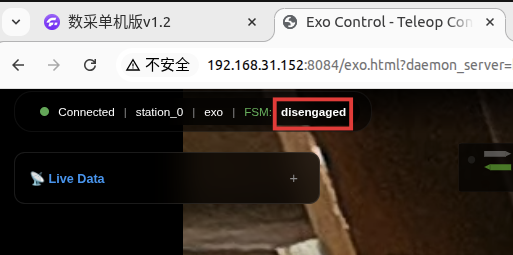
- Confirm the robot is in
disengagedstate
 2. Click "Shutdown Teleoperation"
3. After shutdown, the exoskeleton stops output and the monitoring display stops
2. Click "Shutdown Teleoperation"
3. After shutdown, the exoskeleton stops output and the monitoring display stops
4.6 Teleoperation Viewer
After successfully waking teleoperation, click the Teleoperation Viewer to re-open the monitoring interface and view the robot's current status.
4.7 Advanced Configuration
Check "Advanced Options" and click "Teleoperation Advanced Configuration" to adjust:
| Setting | Description |
|---|---|
| Teleoperation Speed Factor | Choose from three presets or customize based on proficiency |
| Gesture Adjustment | Customize gesture mapping parameters |
| Restore Defaults | Reset all settings to factory values |
After changing settings, click Confirm and re-wake teleoperation for changes to take effect.
4.8 Task Query
Search created tasks by status. Click "Advanced Options" to add cloud task search filters.
4.9 Data Management
View Acquisition Info
Check remaining backpack hard drive space, unuploaded and undeleted data, and uploaded but undeleted data.
Upload Data
The Xiaomi router must be connected to the internet.
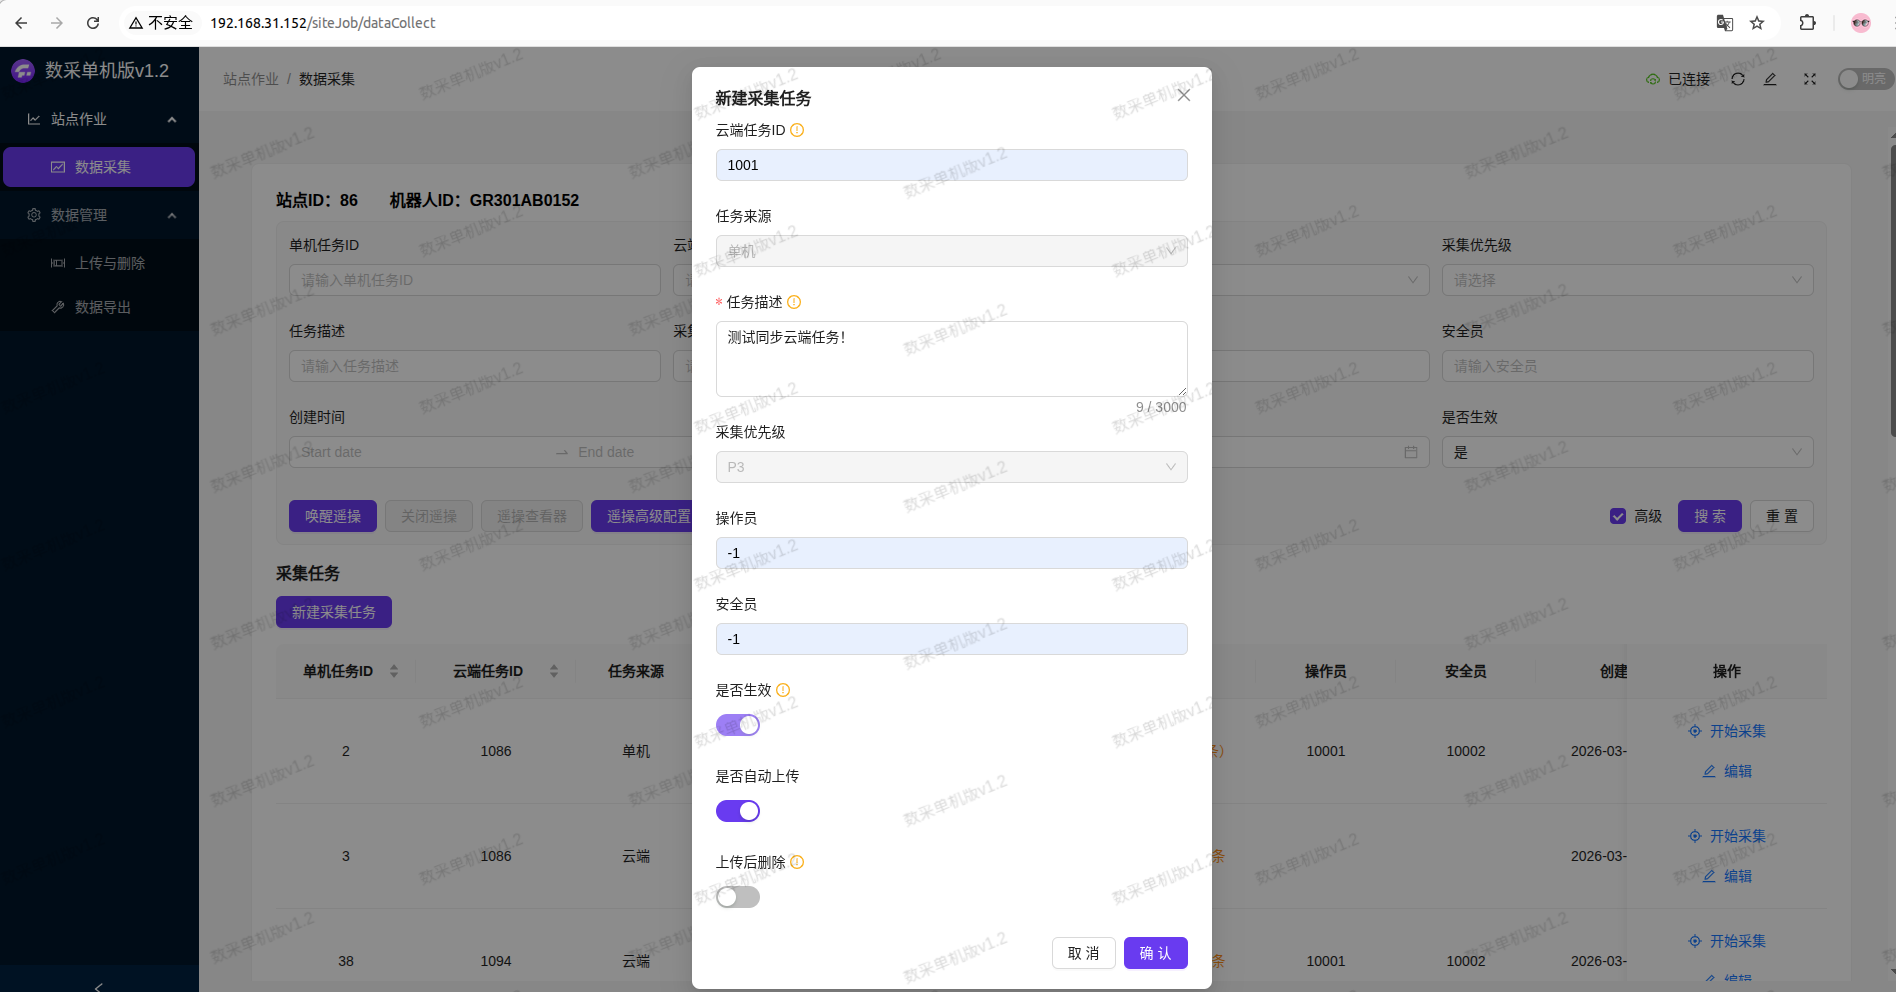
- Select the task to upload and click "Edit"
- Fill in Operator and Safety Officer, select Active and Auto-upload as needed
- Click Confirm to sync with cloud task
- After cloud task ID is synced, data will auto-upload to the cloud platform
- Enable "Delete after upload" to automatically clean up local files after upload
- Click Confirm and wait for upload to complete
Delete Local Data
- Select the task to delete and click "Data Deletion"
- Check the data items to delete
- Click Confirm to delete local data
4.10 Data Download
| Method | Steps |
|---|---|
| Direct PC3 Access | Connect an external monitor to PC3, navigate to /midea/fourier/s3data to view/download data |
| Via Cloud Platform | Retrieve from the data cloud platform (refer to cloud platform documentation for details) |
5. Notes and Troubleshooting
5.1 Safety Notes
- Do not swing arms violently or suddenly release handles during teleoperation — this may endanger the robot or surroundings
- Extreme postures can damage the robot and pose environmental hazards, e.g., twisting the waist at maximum squat depth, prolonged walking at maximum squat depth, lifting heavy objects at maximum squat depth
- Do not use the robot while charging without protection — a power cutoff may occur at the moment the battery reaches full charge
- Monitor battery level during use — power cutoff risk exists when the battery reaches the last bar
5.2 Exiting Teleoperation
Choose the appropriate exit method based on the situation, ordered from safest to least safe:
| Method | Applicable Scenario | Safety Level | Procedure |
|---|---|---|---|
| Exoskeleton Safe Exit | Exoskeleton and both PCs connected normally | Highest: robot maintains standing via algorithm | Stand firm → right blue button → enter "Teleop Wake" state → hoist robot → click "Shutdown Teleoperation" |
| Forced Shutdown | Blue button unresponsive but PCs still connected | Lower: robot briefly holds posture via motor default force | Set fall protection → click "Shutdown Teleoperation" → teleop closed → hoist robot |
| Physical Emergency Stop | Emergency or PC disconnection | Lowest: motors cut power instantly, cannot maintain standing | Set fall protection → press rear red emergency stop → hoist robot → restart robot and teleop client |
5.3 DAQ Software Cannot Obtain IP Addresses
Troubleshoot in the following order:
- Check whether PC1/PC3 are powered on
- Check whether the Xiaomi router is functioning normally
- Check whether the NUC relay is connected to the Xiaomi router
- Try restarting PC1/PC3
5.4 Emergency Handling
In an emergency, immediately shut down the robot using either of the following:
- Use the remote emergency stop controller
- Press the red emergency stop button on the robot's waist
6. Data Conversion
convert_parquet_to_lerobot.py converts raw Parquet datasets collected by the robot into the standard LeRobot Dataset format. It supports state and action parsing, image decoding and resampling, and multi-modal timestamp alignment, producing outputs directly usable for training and simulation.
Source: fourier-lerobot/scripts/convert_parquet_to_lerobot.py
6.1 Input Data Structure
Each episode directory must contain the following files:
episode_xxx/
├── metadata.json
├── observation.state.parquet
├── observation.base_state.parquet
├── action.parquet
├── action.base.parquet
└── observation.images.camera_top.parquet
| File | Key Fields | Description |
|---|---|---|
observation.state.parquet | timestamp_utc, observation.state | Joint state list [{"name": "...", "value": ...}] |
action.parquet | timestamp_utc, action | Action list [{"name": "...", "value": ...}] |
observation.images.camera_top.parquet | timestamp_utc, observation.images.camera_top | AVIF-encoded image byte stream |
metadata.json | notes | Episode task description, used to generate task |
6.2 Core Modules
| Module | Function |
|---|---|
RobotConfig | Defines robot joint, base, and camera configuration |
StateConverter | Parses state and base_state, outputs Tensor[N, StateDim] |
ActionConverter | Parses action and base_action, outputs Tensor[N, ActionDim] |
VideoConverter | Parses camera images, supports resize and square cropping |
DataConverter | Multi-modal timestamp synchronization, nearest-neighbor sampling, frame construction |
6.3 Usage
Basic
python convert_parquet_to_lerobot.py \
    --raw-dir ./raw_data \
    --repo-id user/gr3_dataset
Specify Task Name
python convert_parquet_to_lerobot.py \
    --raw-dir ./raw_data \
    --repo-id user/gr3_dataset \
    --task "pick up cup"
Set Video Resolution
python convert_parquet_to_lerobot.py \
    --raw-dir ./raw_data \
    --repo-id user/gr3_dataset \
    --video-config 640x480
Square Cropping
python convert_parquet_to_lerobot.py \
    --raw-dir ./raw_data \
    --repo-id user/gr3_dataset \
    --square-crop
Multi-Camera
python convert_parquet_to_lerobot.py \
    --raw-dir ./raw_data \
    --repo-id user/gr3_dataset \
    --camera top wrist left right
Pose Mode
python convert_parquet_to_lerobot.py \
    --raw-dir ./raw_data \
    --repo-id user/gr3_dataset \
    --pose
When
--poseis not enabled,state.poseandaction.poseare automatically filled with zeros.
6.4 Output Data Structure
Directory structure after conversion:
~/.cache/huggingface/lerobot/<repo-id>/
├── meta/
│   ├── episodes.jsonl
│   ├── info.json
│   └── stats.json
├── data/
│   ├── chunk-000/
│   └── ...
└── videos/
    ├── observation.images.top/
    └── ...
Feature Schema:
| Feature | Shape | Description |
|---|---|---|
observation.state | [33] | 19 joints + 12 hand joints + 2 base states |
action | [37] | 19 joints + 12 hand joints + 6 base actions |
observation.state.pose | [30] | 18 pose + 12 hand joints |
action.pose | [30] | Same as above |
observation.images.* | [3, H, W] | Image data, H×W configurable via --video-config |
next.done | [1] | True indicates end of episode |
6.5 Data Processing Pipeline
- Parse individual Parquet files
- Timestamp synchronization and 30 Hz resampling
- State / Action / Video conversion
- Frame construction
- Add to LeRobotDataset
- Save episode and encode video
- Generate statistics
stats.json - Output final dataset
Last updated: 2026-06-24